Form Builder
Overview
The Form Builder is where you configure and customise every aspect of your public booking page — your business profile, the services and providers shown, the fields customers fill in, the visual theme, the post-booking message, and how you share or embed the page. Everything is editable in real time and reflected on your live booking URL.
The page header shows your form name, a Live badge (green = publicly accessible), and a Preview button that opens your booking page in a new tab.
General
The General tab controls your business identity, availability, booking rules, and notification preferences.

Business Profile
| Field | Description |
|---|---|
| Company Logo | PNG/JPG/SVG up to 2 MB — shown in the booking page header and confirmation emails |
| Business Name | Displayed prominently on your public booking page |
| Booking URL | Your unique slug — the public booking page lives at /{slug} |
| Contact email shown on the booking page | |
| Phone | Contact number shown in the page header |
| Address | Optional — displayed on the booking page footer |
| Website | Optional link shown on the booking page |
| Tagline | Short line displayed under your business name (e.g. "Transform your look.") |
Timing
| Field | Description |
|---|---|
| Default Booking Duration | The default slot length when no service-specific duration is set |
| Buffer Between Bookings | Gap automatically added between consecutive slots (e.g. 15 min for cleaning time) |
Regional
| Field | Description |
|---|---|
| Timezone | All slot times on the booking page are displayed in this timezone |
| Currency | Price display currency — shown on service cards and payment steps |
Availability
Set which days you accept bookings and your operating hours for each day. Toggle each day on or off. Days toggled off show "Unavailable" and generate no slots for that day.
{warning.fa-exclamation-triangle} Provider-level working hours take precedence over these defaults. If a provider has their own schedule configured (via Business Panel → Providers), their schedule is used instead.
Holidays & Blocked Dates
Block specific dates so no bookings are accepted. Click + Add date to add a one-off closure (e.g. bank holidays, team days off). Blocked dates apply platform-wide — across all providers for that business.
Limits
| Field | Description |
|---|---|
| Max Bookings Per Day | Cap on total daily bookings across all providers. Set to 0 for no limit |
| Minimum Advance Notice | How far ahead customers must book. E.g. "2 hours" prevents same-hour bookings |
Booking Behaviour
| Toggle | Effect |
|---|---|
| Allow multiple services | Customer can select more than one service per booking |
| Allow client cancellation | Clients can cancel from My Bookings or via the cancellation link in their email |
| Show cancellation policy | Displays your cancellation policy text on the booking page |
Notifications
| Toggle | Effect |
|---|---|
| Email confirmation to customer | Send a confirmation email immediately after booking |
| Notify me on every new booking | Send an email to the business owner on each new booking |
Outbound Webhook
Enter a Webhook URL to receive a POST request with full booking data every time a booking is confirmed. Requests are signed with an X-Slotara-Signature header (HMAC-SHA256) so you can verify they came from Slotara. Useful for syncing with CRMs, Zapier, or custom integrations.
Services
The Services tab shows all services available on this booking form. Each service card shows its name, duration, price, and Live/Draft status.

| Action | How |
|---|---|
| Add a service | Click + New service |
| Hide a service temporarily | Toggle its status to Draft — it disappears from the booking page without being deleted |
| Remove a service | Click the delete icon on the right |
| Reorder services | Drag the rows — the order here matches the order customers see in step 1 |
{primary.fa-info-circle} Services appear on step 1 of the customer booking flow. A service must have at least one active provider assigned to appear on the booking page.
Providers
The Providers tab shows all team members who appear as bookable providers on the booking page.
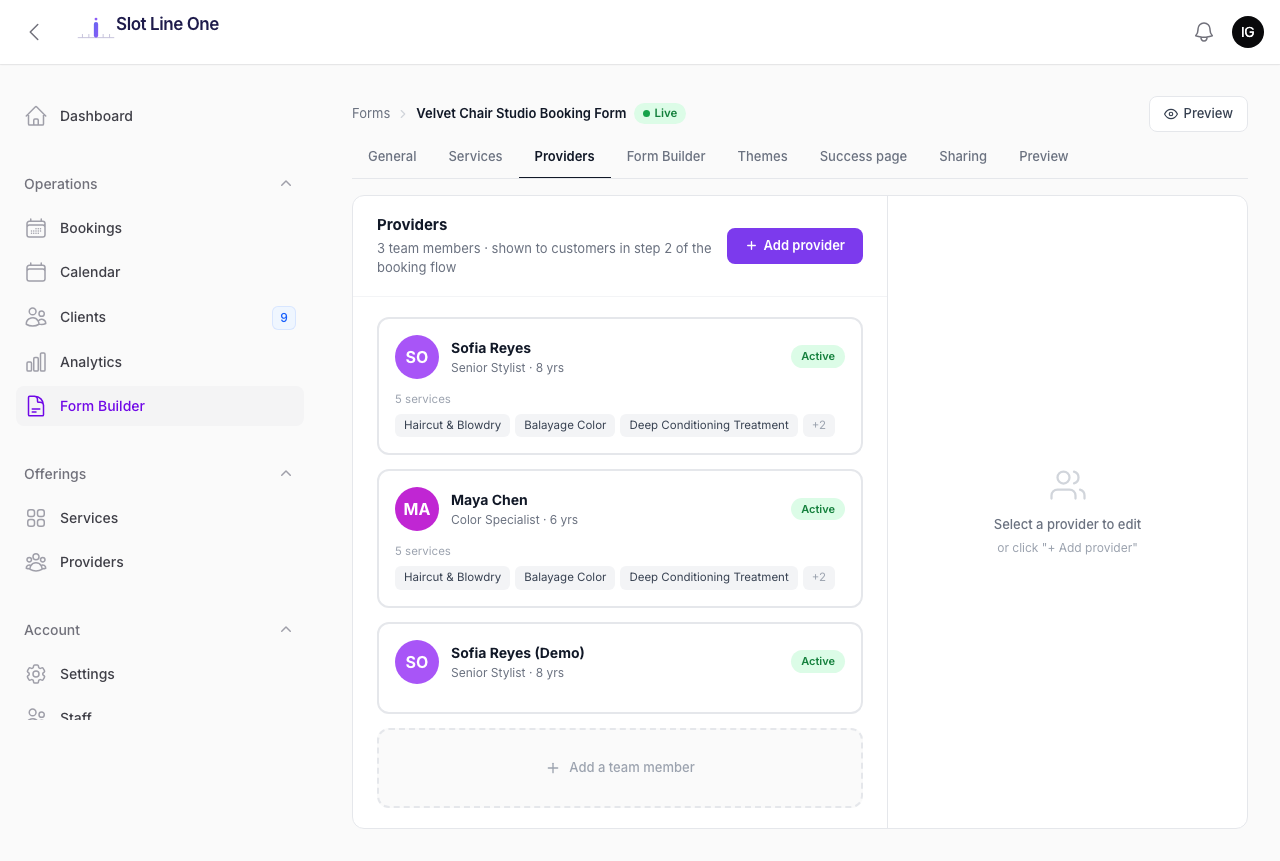
Each provider card shows their name, role, years of experience, and the services they offer. Click a provider card to edit their profile inline on the right side.
| Action | How |
|---|---|
| Add a provider | Click + Add provider |
| Edit a provider | Click their card — the edit panel slides open on the right |
| Deactivate a provider | Toggle their Active status off — they are hidden from the booking page immediately |
| Add a team member | Click + Add a team member at the bottom |
{primary.fa-info-circle} Providers appear on step 2 of the booking flow. If only one provider offers a service, step 2 is skipped and the provider is auto-selected.
Form Builder
The Form Builder tab is the drag-and-drop editor for the Your Details step — the fields customers fill in before confirming their booking.
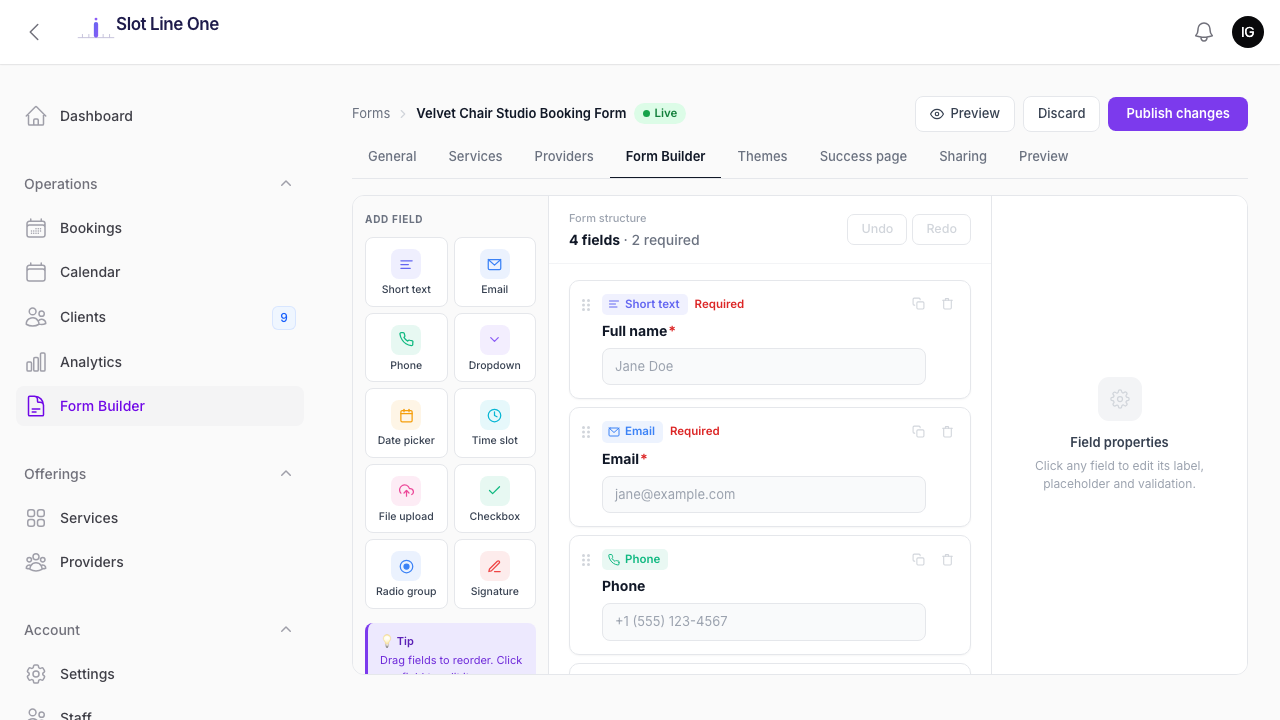
The editor has three columns:
| Column | Purpose |
|---|---|
| Add Field (left) | Field type palette — drag or click to add |
| Form Structure (centre) | Your current form — drag to reorder, click to select |
| Field Properties (right) | Edit the selected field's label, placeholder, and validation |
Available Field Types
| Type | Use case |
|---|---|
| Short text | Single-line text input — names, reference numbers |
| Email address with format validation | |
| Phone | Phone number with international format |
| Dropdown | Single selection from a list of options |
| Date picker | Customer picks a date |
| Time slot | Customer picks a time |
| File upload | Customer attaches a document or image (PDF, JPG, PNG) |
| Checkbox | Boolean tick box — e.g. "I agree to the terms" |
| Radio group | Single selection from visible button options |
| Signature | Touch/mouse drawn signature captured as an image |
Default fields
Every new form starts with four pre-built fields that match the booking record:
- Full name — Short text, required
- Email — Email, required (locked to account email for logged-in clients)
- Phone — Phone, optional
- Notes — Short text, optional
You can edit labels and placeholders on these fields but cannot delete Full name or Email (they are required to confirm the booking).
Editing a field
Click any field in the Form Structure column to open its properties on the right:
- Label — The text shown above the field
- Placeholder — The grey hint text inside the input
- Required — Toggle to make the field mandatory
- Options (Dropdown / Radio group) — Add, remove, and reorder the selectable choices
Publishing
Changes to the form structure are not live until you click Publish changes. The Discard button reverts all unsaved changes. The field count at the top of the Form Structure column updates as you add or remove fields.
{warning.fa-exclamation-triangle} Form responses are stored per booking. You can view a customer's answers by opening any booking in Business Panel → Bookings → View.
Themes
The Themes tab controls the visual appearance of your public booking page.
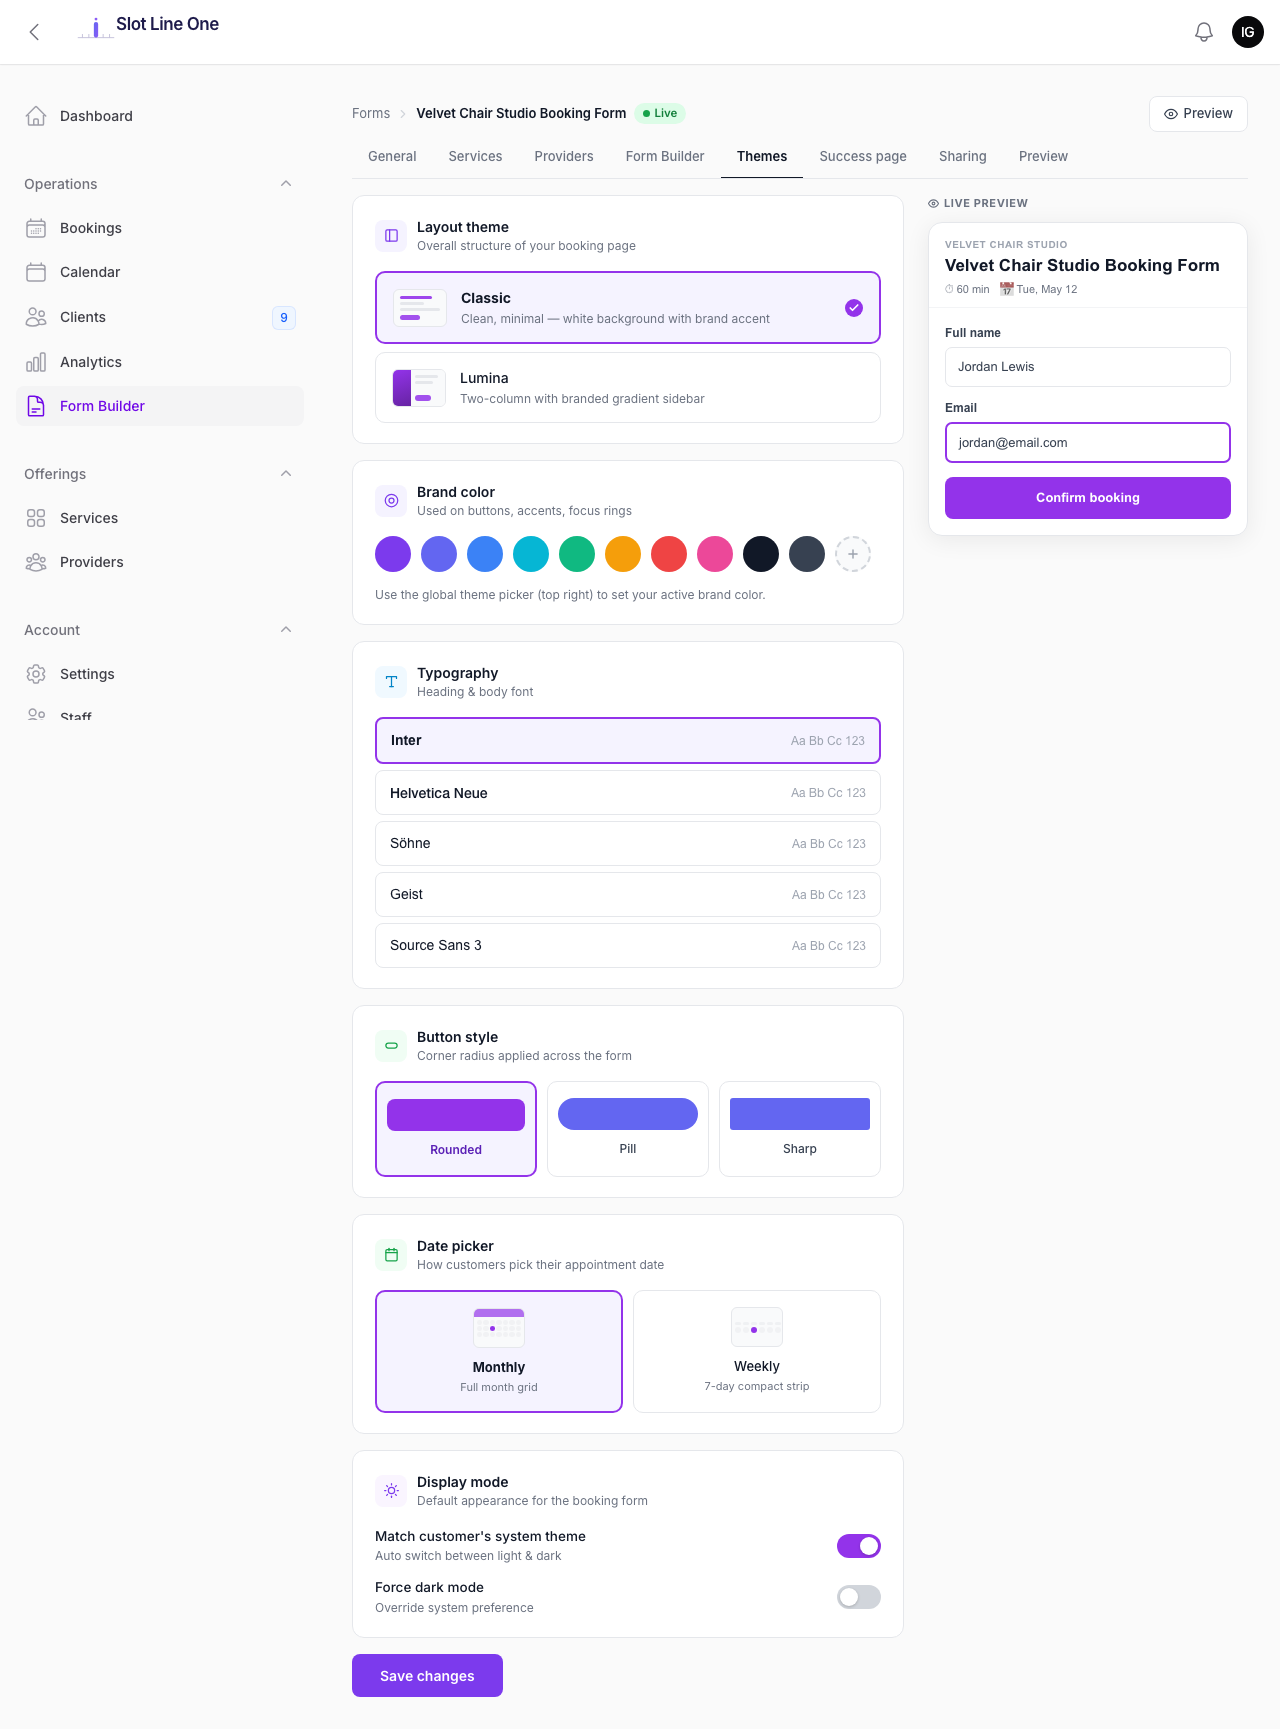
Layout Theme
| Theme | Description |
|---|---|
| Classic | Single-column, white background with your brand colour as an accent. Clean and minimal — works for any business type |
| Lumina | Two-column layout with a branded gradient sidebar showing your logo and details. More visual impact for premium brands |
Brand Colour
Pick from 10 preset swatches or use the custom colour picker (top-right of the page). The chosen colour is applied to buttons, active step indicators, links, and accents throughout the booking flow.
Typography
Choose the font used for all headings and body text on the booking page:
| Font | Character |
|---|---|
| Inter | Modern, clean — recommended for most businesses |
| Helvetica Neue | Classic and professional |
| Söhne | Contemporary editorial feel |
| Geist | Technical, minimal |
| Source Sans 3 | Friendly, open |
Button Style
| Style | Shape |
|---|---|
| Rounded | Softly rounded corners — approachable |
| Pill | Fully rounded ends — modern and friendly |
| Sharp | Square corners — formal and corporate |
Date Picker Layout
| Layout | Description |
|---|---|
| Monthly | Full calendar grid — customers see the whole month at once |
| Weekly | Compact 7-day horizontal strip — faster to navigate for near-term bookings |
Display Mode
| Setting | Effect |
|---|---|
| Match customer's system theme | Auto-switches between light and dark based on the customer's OS setting |
| Force dark mode | Always show the booking page in dark mode regardless of OS setting |
Success Page
The Success page tab controls the confirmation screen customers see immediately after their booking is confirmed.
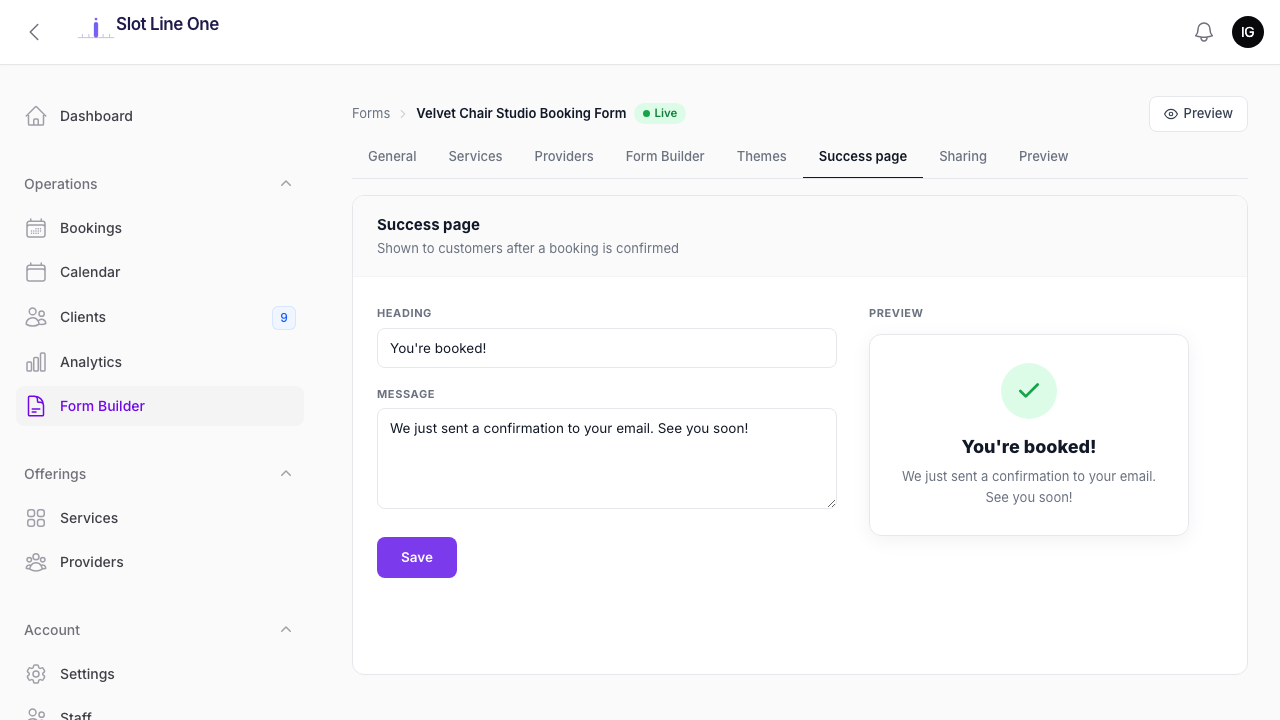
| Field | Description |
|---|---|
| Heading | The large text displayed at the top — e.g. "You're booked!" |
| Message | Supporting text — e.g. "We just sent a confirmation to your email. See you soon!" |
A live Preview panel on the right shows exactly how the success screen will look. Click Save to apply.
Sharing & Embed
The Sharing tab gives you everything you need to get your booking page in front of customers — whether that's a direct link, an embed on your website, or a printable QR code.
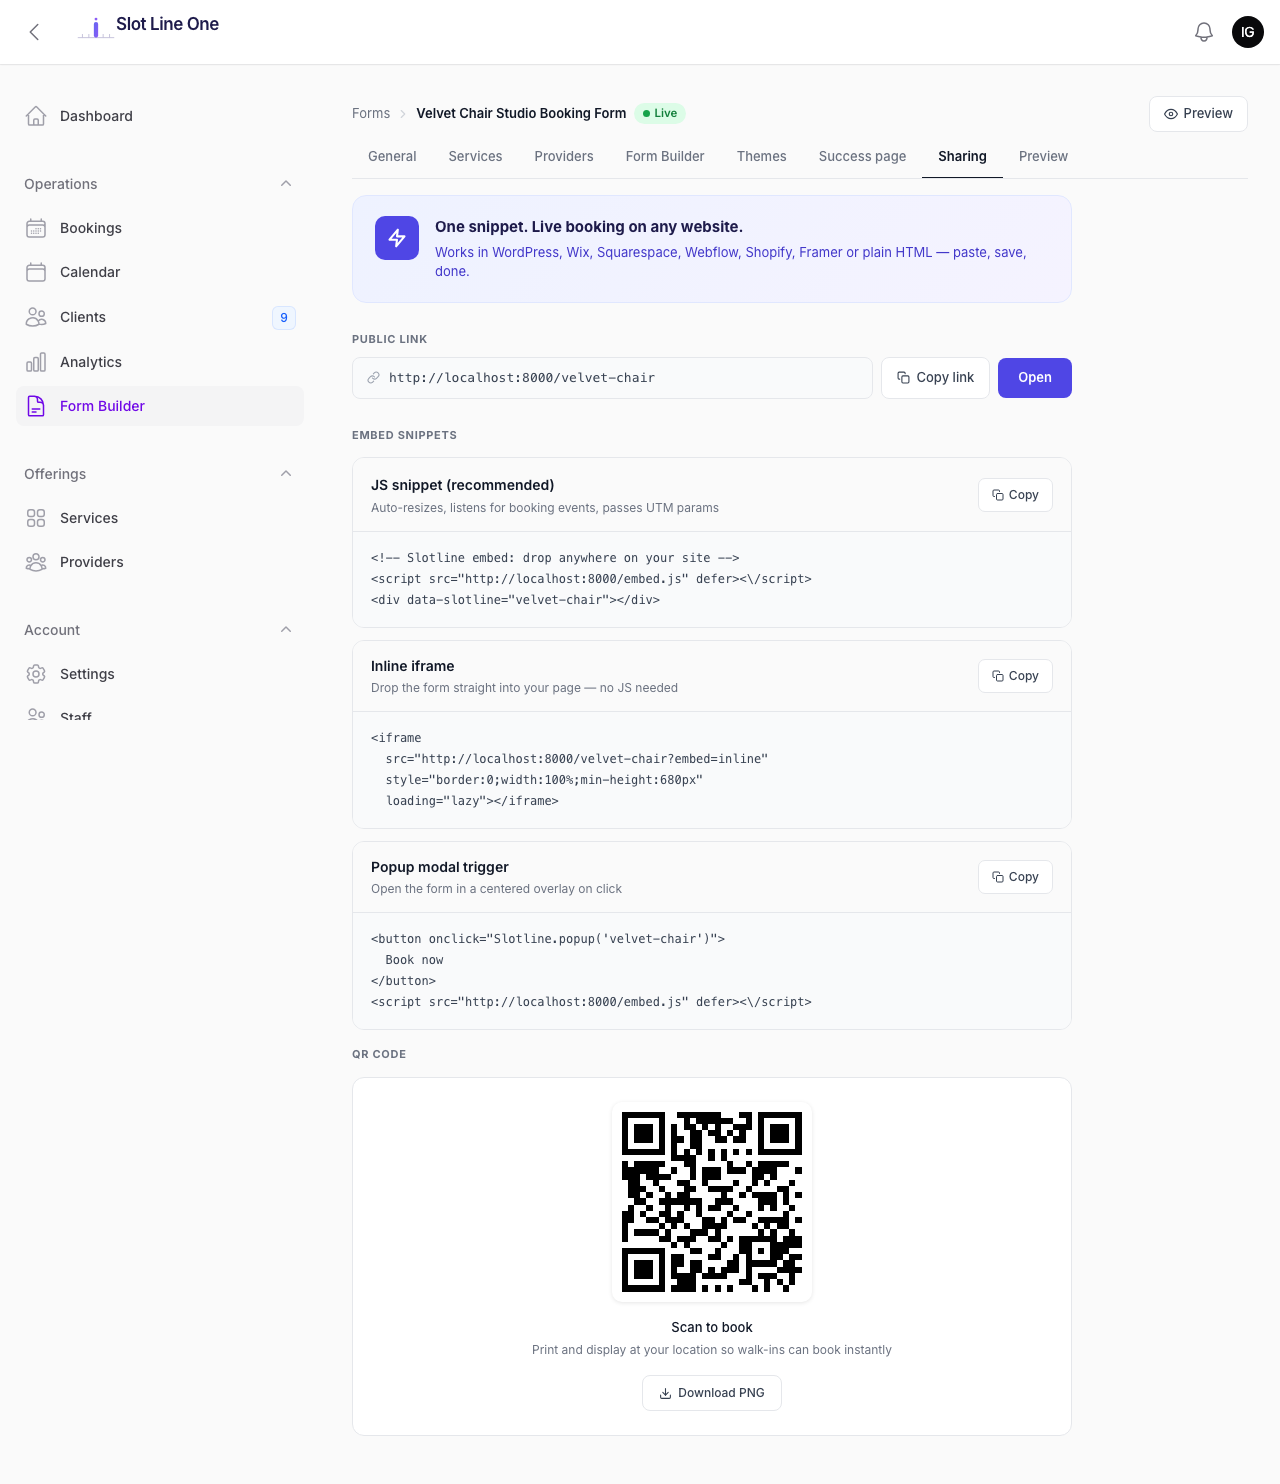
Public Link
Your booking page URL: https://yourdomain.com/{slug}
Click Copy link to copy it to the clipboard. Click Open to visit it directly.
Embed Snippets
Three embed options let you add the booking flow to any existing website:
| Option | Best for |
|---|---|
| JS snippet (recommended) | Any website — auto-resizes, listens for booking events, passes UTM parameters. Paste the <script> and <div> tags where you want the form to appear |
| Inline iframe | Sites where JavaScript is restricted. Drop the <iframe> tag anywhere — no JS required |
| Popup modal trigger | Add a "Book now" button to any page. The booking form opens in a centred overlay when clicked |
All three options work in WordPress, Wix, Squarespace, Webflow, Shopify, Framer, and plain HTML.
QR Code
A unique QR code is generated for your booking page. Click Download PNG to save a high-resolution version — print it on business cards, menus, receipts, or in-store signage so walk-in customers can book instantly.
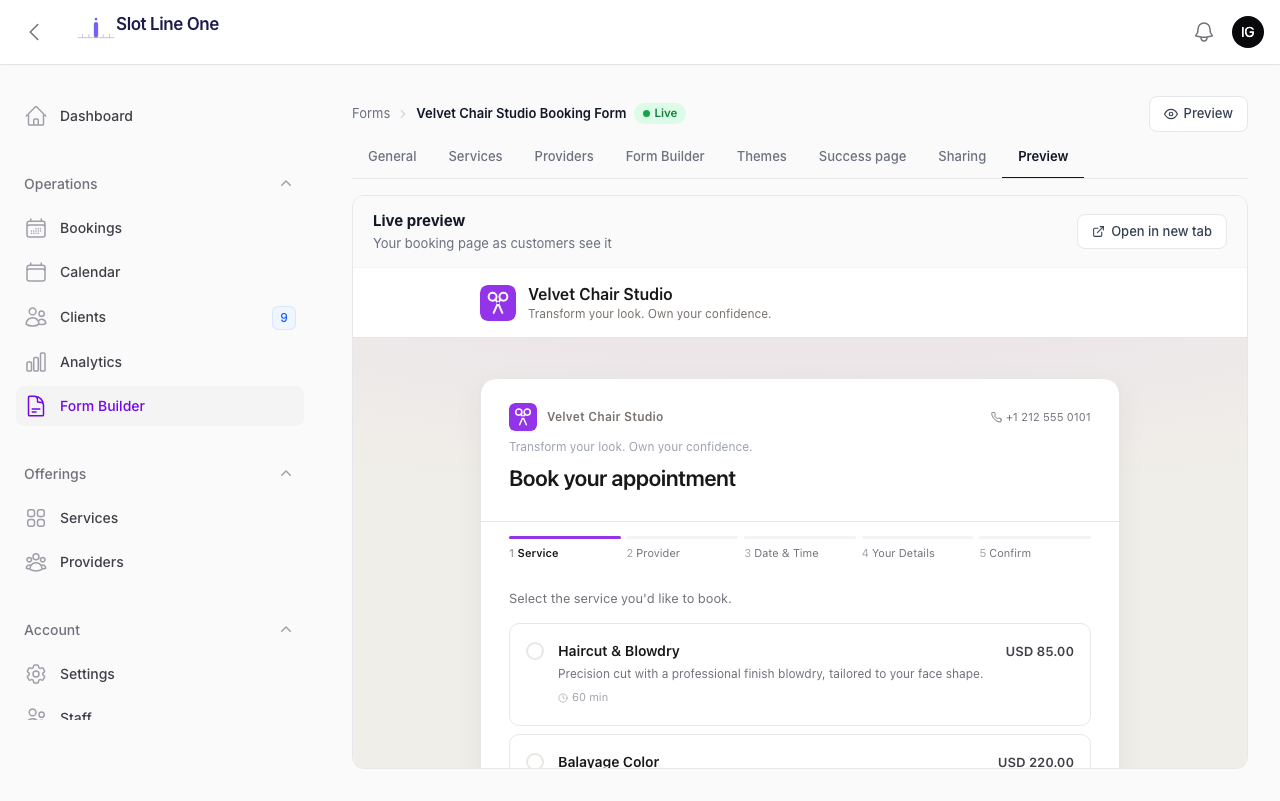
Preview
The Preview tab shows a live, interactive version of your booking page exactly as customers see it — inline within the Business Panel.
Click Open in new tab to open the full page in a separate browser window. This is the same URL your customers visit — you can walk through the complete booking flow from start to finish to verify your setup before sharing it.